
|
|
|
| Newsletter List | |
|
|
|
|
|
Another key company has been added to Intusoft's list of partnerships. ACME Magnetics USA, located in Southern California outside of San Diego, and Intusoft have joined forces to include ACME's ferrite materials and geometries into Intusoft's Magnetics Designer product. ACME is one of the world's largest producers of ferrite materials for the manufacture of magnetic devices. The companies are aware of the need to represent magnetic materials manufactured in the Asian territory since the vast majority of today's magnetic manufacturers originate from that region. The collaboration consists of both marketing and technical aspects. In the marketing domain both companies have put the announcement on their respective websites, including links to the partner's website. They are also informing their respective sales prospect and customer bases of the developing relationship. Intusoft was invited to share ACME's booth at APEC 2008 in February. The show enabled Intusoft to showcase the new ACME ferrites in its Magnetics Designer product. In time, more materials and geometries will be added into Magnetics Designer by way of both companies' technical staff. |
|
|
GCi Technologies headquartered in Plano, Texas USA spawned the initial effort to include ACME ferrite materials into Magnetics Designer. Richard Meyer, engineering manager for GCi, was instrumental in supporting the collaboration to enhance the speed in developing GCi's magnetic devices compared to using spreadsheets. GCi has informed several of the companies for which they do business about the Intusoft/ACME collaboration. For those not familiar with Magnetics Designer, the inductive-device design system enables datasheet-like entry to generate a SPICE simulation model and files for manufacturing. It runs on Windows 2000 through VISTA platforms. Magnetics Designer creates many types of layer and sector/split bobbin wound transformers and inductors. Its database contains thousands of cores, a wide variety of materials and wire, and both linear and saturable-core SPICE models. The program predicts magnetizing and leakage inductance, inter-winding capacitance, peak flux density, DC winding resistance, high frequency AC resistance (including proximity effects and skin effect), AC and DC copper loss, core loss, weight, temperature rise, layer fill and window fill percentage. More can be found at: http://www.intusoft.com/mag.htm. |
|
|
|
|
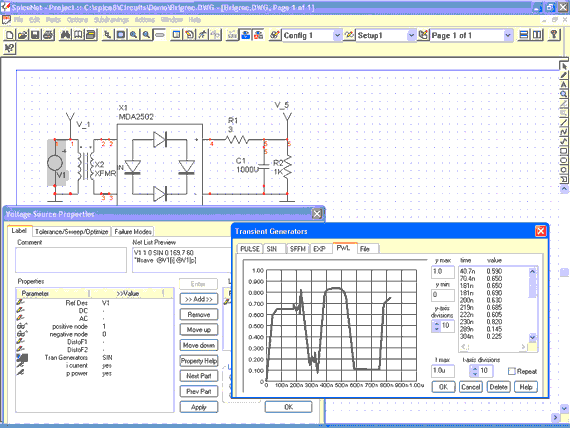
Scheduled for April, 2008 will be a new ICAP/4 and Test Designer software release. Apart from refinement of the software from today's Build 3090, two main features have been added to the software. The first feature is an arbitrary piecewise linear (PWL) waveform creation capability by way of the mouse or file input. From a signal source's Part Properties dialog, select "Tran Generators" then PWL. Instead of typing in time and value data points like before, you simply click on a graph (grid) to arbitrarily place data points using the mouse. What's nice is once your arbitrary PWL waveform is complete you can click anywhere in the grid and the waveform will conform to that point. Further, you can also draw a bounding box around any portion of the waveform, then drag and drop the bounding box to move the selected waveform area, or press the backspace key to delete the data points. The PWL tab supports undo <ctrl>+z and redo <shift>+<ctrl>+z. You can also directly link to a .TXT file of data points using the "File" tab. In all, PWL now has some very powerful and timesaving features.
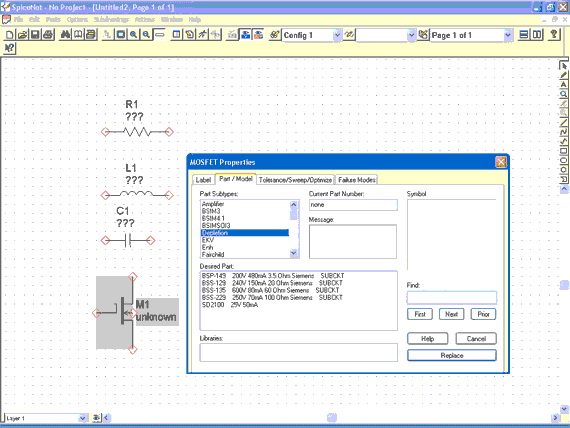
The second main feature in Build 3247 is an automated component conversion capability from generic or real devices, to different real devices, which are acquired from SpiceNet's parts browser. The new feature accommodates resistors, diodes, capacitors, BJTs, JFETs, inductors, and MOSFETs. You can quickly convert generic parts or many real parts, from a selection of similar parts displayed in a dialog. Simply use hotkeys or menu pulldowns to quickly place generic or real devices on your schematic. Double-click on the part to bring up the Part Properties dialog. Select the "Part/Model" tab to see all available parts of that type, select the specific device you want, and press the "Replace" button - very convenient!
Other aspects brought forth by the new release include several improvements to ICAP/4's Pspice-to-IsSpice4 Converter, and the addition of new simulation models. Also, when holding down the Shift key to select multiple waveforms in IntuScope, previously all of the round legend ID tags atop were solid color, making it hard to distinguish which waveforms were selected. Now, the ID tags will fill solid in color to show when multiple waveforms (or single) are selected. Waveforms not selected will be grayed out. Once waveforms are selected, the Backspace key can be used to delete them, or they can be copied and pasted to a new plot. |
|
For our software release post Build 3247, we are interested in your input as to what new features you feel should be added to the software. Please email your ideas to: rmktg@intusoft.com. |
||||
|
Intusoft has refined its website, starting from the home page at www.intusoft.com. Take a moment to observe the streamlining of the home page, including some new things. Other pages have been refined such as the products page, SPICE modeling page, site map, and the top of the product comparison chart. Check the homepage from time to time for new announcements. |
||||
|
Intusoft's "Got Fault?" article was accepted for publication in Power Electronics Technology magazine for July of this year. "Got Fault?" was included in Intusoft's newsletter #80 at: http://www.intusoft.com/nlhtm/nl80.htm. The version submitted to PET is a little different and more refined, so it will be worth reading when it comes out. It will be available in print and on the publisher's website at: http://powerelectronics.com. |
||||
|
For new users of ICAP/4 and Magnetics Designer, a new software training course has been developed for these products. Last year Intusoft revamped its entire customer training material, basically throwing away the old format and devising a very effective and comprehensive format, including several labs. The ICAP/4 course is two days and covers SPICE history; windows operations; schematic creation, layering and configurations; an array of debugging operations; waveform viewing and signal processing; sweeping, advanced simulation techniques, multi-run analyses such as Monte Carlo, Worst Case, and Extreme Value; model import off the internet; model creation; setting/recording of electrical measurements for charting, including pass/fail against test limits; and more. The Magnetics Designer course is one day and covers all the features for the design and simulation of inductive devices. The training covers program history, design algorithms, parasitics, windings, wiring, materials, core families, data entry, high frequency design & considerations, optimization, outputs & interfaces, SPICE models, design examples and more. Customer training can be obtained in three ways for ICAP/4, and in two ways for Magnetics Designer. ICAP/4
Magnetics Designer
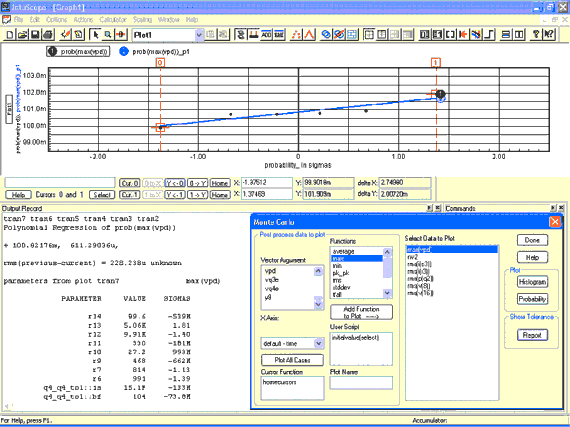
For customer training logistics and cost please call Intusoft at: 310-952-0657. For both new and existing users of ICAP/4 and Test Designer there are innumerable features and techniques for heightening your design's reliability and speeding the design cycle. It's almost impossible to know every aspect of the software, as it is incredibly extensive in its capability. You may have never run a worst-case analysis on your design, or used the innermost features of a Monte Carlo statistical analysis. New users may not know the power and advantage of the blue IsSpice4 window environment that comes to view during a simulation, and so on. Following are a few tips to help make most use of your ICAP/4 tools. Tutorials, Manuals and Books For new users, look at your Help pulldown menu in the SpiceNet design-entry window. Here you will find under "New User" one or two New User's Tutorials. The more advanced tutorial is provided with ICAP/4Windows and higher offerings. Be sure to go through these to get a fast “readers digest” roadmap to quickly becoming familiar with the entire design entry through production-readiness flow. With the first tutorial you’ll be able to use the tools with enough proficiency to enter designs, simulate, view waveforms, and gain proficiency with other helpful functions.With the second tutorial you will perform more advanced operations within SpiceNet and IntuScope, plus set up electrical measurements with pass/fail limits, run Monte Carlo statistical analysis, parametric component sweeps, and add a new SPICE model from the internet. Monte Carlo "Report" Option Monte Carlo statistical analysis is used to randomly vary component tolerances throughout their tolerance range, as any desired amount of simulations are run varying the tolerances each time. Running the "Monte" simulation script for SpiceNet's "Simulation Control" dialog produces a family of curves, histogram bar-graph plot, and probability density plot of the simulation results. A probability density plot shows the measurement value (i.e., voltage at Vout), verses the deviation (in sigmas) from a 0% tolerance variation. Also located in the "Monte" dialog from IntuScope, is a "Report" box (option). After a probability density plot is made, if the Report box is selected, then in the SPICE output file and in IntuScope's "Output Record" window the actual component values are displayed for the Monte Carlo simulation run. For example on your Sample2.DWG drawing, a Monte Carlo simulation was run for 6 cases (runs). Following is the probability density screenshot and results from the report option. The design signal selected for data recording is vpd and the function is maximum voltage.
The numbers shown under the "Parameter" heading represent the components in the design (not all shown), and their value when signal line vpd was measured at Cursor 0's point in time. This simulation plot was titled "tran7" by IntuScope. Also displayed is the component's deviation from zero tolerance change, measured in sigmas. 3-sigma represents the device's normal tolerance value. If Cursor 0 is advanced to the next dot (data point) in time, and the Report option is selected again, then new component value data is displayed, and would be titled "tran6." The process is helpful in ultimately refining component values to achieve optimal circuit performance. Recording Electrical Measurements at Strategic Points in a Design Simulation Have you ever thought it would be nice to know for example the peak voltage between two distinct points in time in a design's operation? Another example might be the RMS reading between say 1.006 and 1.010 milliseconds in time, or the rise time within a time interval. You might desire the bandwidth between two points in frequency in an AC simulation. You could achieve these sorts of things by continuously plotting waveforms from simulation runs and calculating the desired electrical measurement at strategic points on a time-domain plot , or calculating bandwidth based on the roll-off from an AC plot. However, there's a much more convenient and powerful way to achieve such tasks by using ICAP/4's scripting commands and its Simulation Control dialog's "Measurements" tab. Our
first example uses your Sample2.DWG drawing. From SpiceNet's "Simulation
Control" icon or pulldown, select the dialog box's "Measurements"
tab. The "Closed Loop+Tran" test setup is selected. The RMS function is selected amongst many other choices. This brings up the following text: RMS Format: RMS(vec vector) Parameters (1)
Return Value
Remarks
Example The following example demonstrates the use of RMS SetCursor(0,25n) As you can see, the example makes it very straightforward to setup and simulate the RMS value between two points in time. The print statement at the end of the example does not have to be used. This is because such design nodes and components (i.e., Vout, Vin, etc.) can be selected by mouse click from the "Vectors" pulldown menu. The SetCursor(0,25n) in the example, for instance, is prescribed by clicking on the "Cursor Functions" menu pulldown, then typing in the time values in the "Cursor Script" window just above. Finally, "Next" and "Finish" are selected prior to running the simulation. After "Simulate Selections" from the "Main" tab is selected, the "Result" box can be pressed to see the desired measurement for any design signal or device selected. From that point on, any change can be made to the design, re-simulated, and the new measured results charted from the Simulation Control's "Results" dialog. This saves a lot of time interpreting gobs of waveforms and doing calculations from IntuScope's Waveform Calculator to achieve similar results. In a more complex script example, if you select the "Measurement Examples" keyword from atop the "Cursor Wizard" Help window, you'll find several examples of sophisticated types of measurements that can be performed between points in time or frequency set by IntuScope's cursors. One such keyword is "Bandwidth." An actual example of this can be found in the BUTTFIL1.DWG file. Open this drawing and in Simulation Control's dialog, select the "Measurements" tab and you will find an actual "Bandwidth" measurement setup. If you click on that and select the "Edit Test Group" box to the right you can observe the bandwidth measurement setup. Also obtained from the "Cursor Wizard's" Help box as before, the following description of the Bandwidth script is shown for this example: "This script measures the bandwidth, 3dB below max, of an AC plot. Vresult is the vector for which we want the bandwidth. The result is saved in bandwidth. The ??? in Vsignal must be replaced with the name of the vector you want to measure (V(3), Vqe4, etc.)." |