
|
|
|
| Newsletter List | |
|
|
|
|
Most commercial solar panels are series/parallel combination of silicon photovoltaic, PV, p-n junctions. Each cell behaves like a silicon diode in parallel with a current generator. The magnitude of the current is proportional to the illumination. When a cell is exposed to the solar energy, photons with energy equal to the material bandgap (Eg) are converted into electrical energy. Photons with energy less than the bandgap do not contribute to the electrical energy. Photons with energy greater than the bandgap will waste energy greater than Eg. For Silicon, efficiency ranging from 10% to 20% is commercially available. Gallium Arsenide cells can be made with nearly double the efficiency of Silicon; however, GaAs is a more difficult (expensive) technology, mainly because of the brittle nature of the crystal. If multiple bandgap materials are used, the efficiency can grow beyond 50%. Very little has been done in recent years to extend photovoltaic (PV) device efficiency. Currently, DARPA (The Defense Advanced Research Projects Agency) is soliciting proposals to do just that. |
|
||||||||||||||||||||||||||
|
|
There is nearly an inexhaustible supply of solar energy incident on the earth. In most parts of the world, it amounts to 844 watts/m2 averaging over 4000 hours per year in parts of the western US, down to 2000 hours in Western Europe[1]. Unfortunately, the PV industry has used a degree of specsmanship to characterize a watt of PV array capacity. As solar energy is incident on the earth, the photons travel through the atmosphere resulting in an Atmosphere Multiplier (AM). AM1.5 is taken as the average, but the industry uses AM1 to “rate” their products, making the incident radiation 1000 watts/m2. That level is achieved at the equator with the sun directly overhead, a condition that occurs only twice a year, even at the equator! Then the temperature is set unreasonably low at 20 Deg C. resulting in overestimating efficiency by 20%, as will be demonstrated using the PV array models. So, it is necessary to multiply the published cost per watt by 1.5! The watt delivered using the industry method will be referred to as the phantom watt. |
|
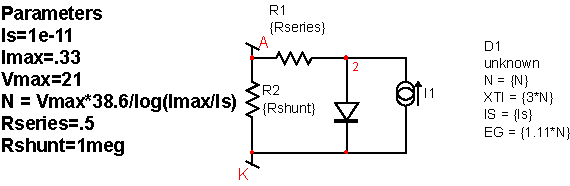
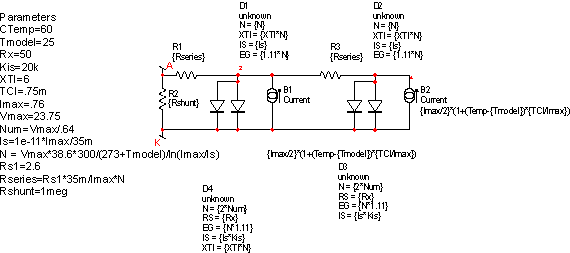
For a simulator, the SPICE silicon diode coupled with a photocurrent generator and ohmic resistance does the trick[2]. The model shown in Figure 1 shows how it’s done.
It’s assumed that solar cells are connected in series to achieve the desired open circuit voltage. Rather than connecting many diodes in series, it is convenient to scale the SPICE diode model. The diode model parameters that have been scaled are:
The latter 3 parameters must be scaled to get the proper temperature coefficient. This model is correct if each cell is identical and has the same incident solar energy. If a shadow is cast, the cells with lower output current will determine the overall current. This is somewhat mitigated by connecting an external diode in reverse across each cell. Then if one cell has no output, the panel voltage will be reduced by the loss of voltage in the affected cell plus the drop in the auxiliary diode. For small panels, shadows and cell-to-cell variations shouldn’t make much difference, and the model simplification is justified. If, on the other hand you need to account for variability in illumination, you should replicate as many cells as are required. |
||||||||||||||||||||||||||||||||||||||||||
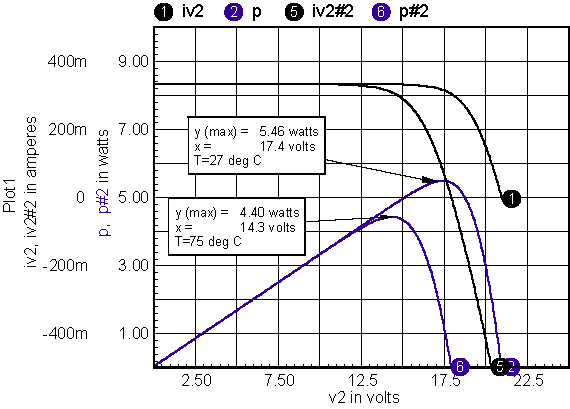
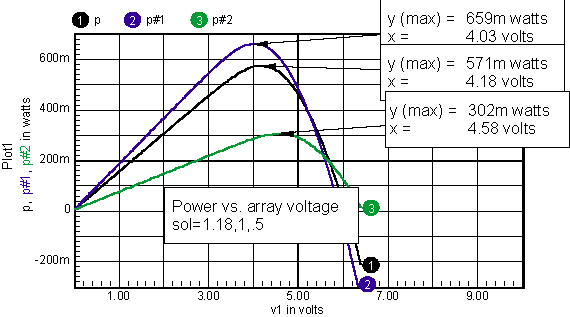
| There is a unique operating point for which maximum power is delivered. Figure 2 illustrates this for a typical mono-crystalline solar panel.
The peak power operating point will vary with temperature and solar illumination. Happily, the high temperature case occurs when solar illumination is also high. That’s because it’s warmest on a sunny day. A rough estimate of the effect is made by assuming that about 50% of the incident solar illumination results in heating of the solar panel. Then the power density is .5*I*1e-4 watts per cm2 where I is the incident solar illumination in watts per m2. We know from thermal properties that in various semiconductors, heat transport raises temperature by about 300 Deg C. per watt/cm2. Moreover, the ambient temperature on a warm day is about 35 Deg. C and 20 Deg C. on a cooler day in a warm climate (assume .4*I). An equation can be written approximating the ambient temperature (Ta) as a function of solar illumination as:
The temperature rise, Tr, is:
And finally the solar cell temperature, Tc, is:
This is a very approximate calculation, but it allows a more aggressive design because the lower efficiency at high temperature is mitigated by the coincidently higher solar illumination. |
||||||||||||||||||||||||||||||||||||||||||
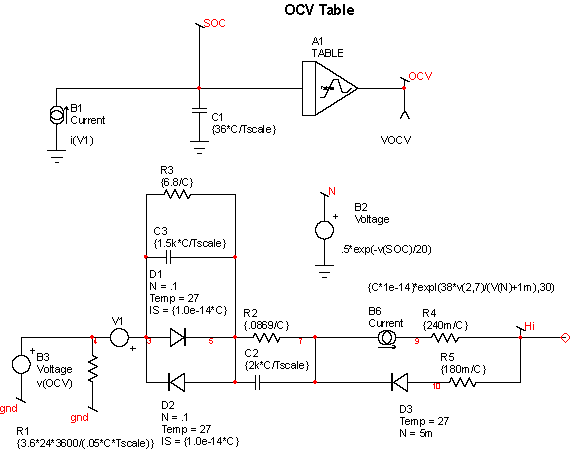
In the paper by Suleiman Abu-Sharkh and Dennis Doerffel [3], a battery model is described for a high power Lithium-Ion battery. An IsSpice4 model was made using the techniques and data described, and it was scaled down for use with a C cell (1.4 amp-hr, 3.6 volt). Figure 3 shows how the IsSpice4 model is implemented. Diodes D1 and D2 replace the zener diode in the Abu-Sharkh model. The nonlinear resistor, R01, is implemented using diode D3 and controlled current source B6. The scaled model tends to agree with various manufacturers published data.
Batteries hold their charge for many hours, making a SPICE simulation impossible over the entire charge-discharge cycle when other circuit operations need to be simulated. This temporal mismatch is resolved by scaling the battery time by a factor of 3600, changing hours into seconds. Time constants on the order of seconds are long enough to appear to be steady state for surrounding circuitry, and are short enough to run simulations without running out of memory.
|
||||||||||||||||||||||||||||||||||||||||||
Two battery charging techniques will be compared
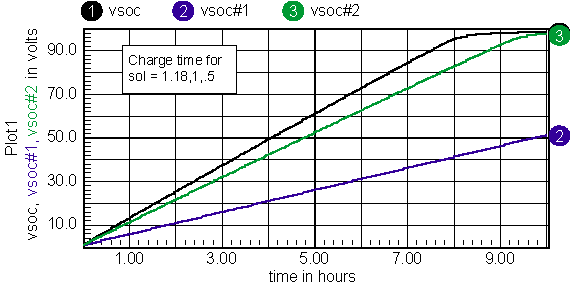
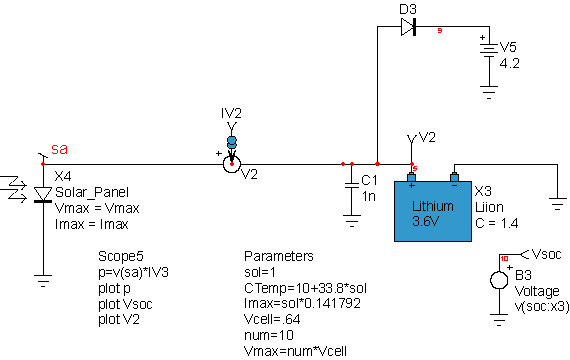
In the first case, the number of series cells is varied so the “best” combination is chosen to work over the expected operating temperature range. Figure 4 shows the schematic, and resulting data is shown in Figure 5. The charger works best when the peak power voltage exceeds the battery voltage. If the maximum cell temperature is 60 Deg C. then 10 cells are required. The parameter calculation uses the cell-temperature estimate developed earlier, and adds the concept of a normalized incident radiation, sol, where sol=1 for AM1.5 conditions. Notice the voltage clamp using D3 and V5. Lithium-Ion batteries must not be overcharged for safety concerns. The voltage clamp, along with short circuit protection is internal to consumer cells. OEM cells require the manufacturer to provide safety features that include:
This technique wastes incident solar energy and requires mode solar cells than a peak power tracking solution would require.
Plugging in the power values into the array simulation results in the data shown in Figure 8. Unfortunately, the power loss from housekeeping power and converter efficiency wipes out the MPPT gain. So, it’s unnecessary to proceed further with the design because the simpler direct charge method produces superior results.
TOP Poly crystalline panels use a less efficient and lower cost technology. This technology is widely used in lower power modules. The cost for a 10-watt module runs about $100. These small panels are used widely in undeveloped regions to operate electronic devices, such as TV’s or PC’s, for a few hours a day. The arrays are built to charge a Lead-Acid gel type battery. This battery can be “over-charged” to equalize the SOC in the series cells. It is necessary to keep the over-charge voltage low enough to prevent formation of Hydrogen gas. The poly crystalline PV array isn’t accurately modeled using the mono-crystalline model, as shown in Figure 9.
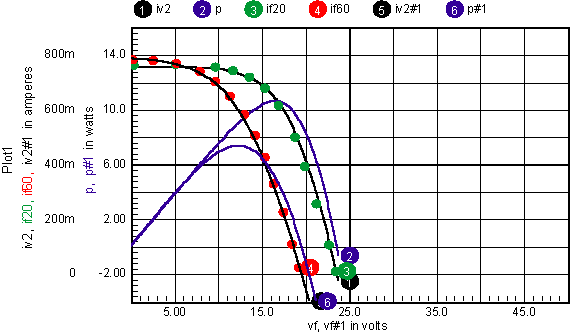
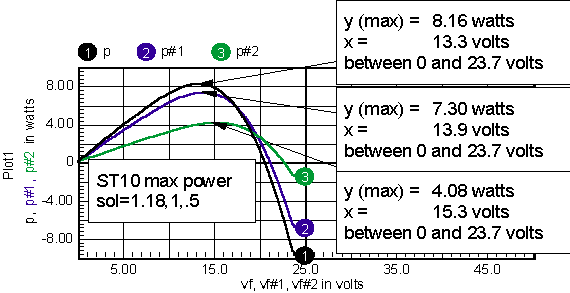
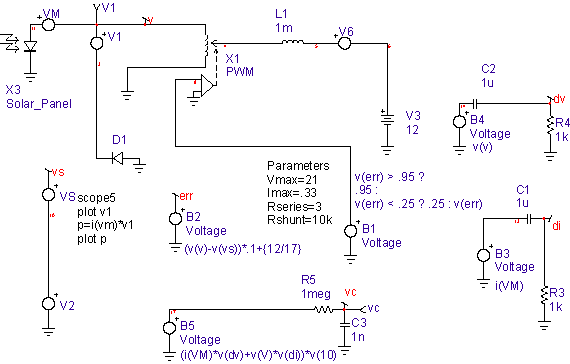
Several additions to the model are needed for the Poly crystalline array. First, in 1996, Zekry, et. al. [4], pointed out that lateral resistance in the array could be modeled by using a distributed model, that is, parallel diodes and photocurrent generators connected by resistors. If 4 such sections are used, the problem can be reduced to 2 sections by recognizing symmetry between the 2 anode contacts. Adding this affect gets a fit at higher array voltages (high diode current). Next, the generation-recombination current needs to be included. This was done by adding a parallel diode with 2*N emission coefficient. The extra diodes series resistance and saturation current were used as free parameters to make the best fit to the data. Figure 10 shows how the model compares to the published data at 20 and 60 Deg C for the Shell ST10 module. Figure 11 shows the model schematic.
Next, the steps in the previous Lithium-Ion battery charger can be repeated using the poly crystalline model and a Lead-Acid battery. First, the solar array power vs. illumination curves is used to determine the peak power tracking points vs. illumination. These data are shown in Figure 12.
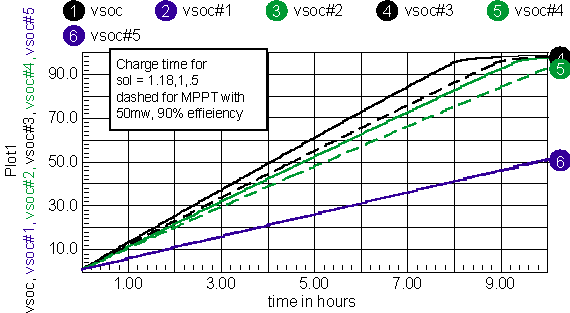
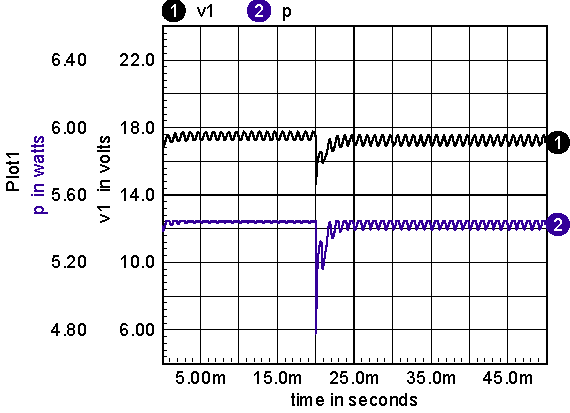
Fortunately, we already have a Lead-Acid battery model, so it’s only necessary to connect the array directly to the battery to get the charge times. Then, using the previously computed peak power operating points, the charge times can be calculated using a constant power source to charge the battery. The results are shown in Figure 13.
The only substantial benefit for MPPT tracking is to increase the SOC from 54% to 60% in the winter. That would not seem to justify the increased complexity in this application. So, when would you use peak power point tracking? Evidently the overhead in terms of power and circuit complexity must justify the inclusion of MPPT. For battery chargers, once you get to a 100% state of charge, then nothing you do will improve the situation. That means MPPT is only useful when the solar radiation is low, or varies a lot in cloudy climate. Even then, it’s only a 10% or so improvement, which is easily gained be increasing the size of the solar panel. On the other hand, if the battery is oversized, it will never fully charge and the maximum energy can be recovered. That’s equivalent to returning energy back to the power grid. Moreover, when energy is returned to the power grid, there must be a switching power supply so that its inefficiency doesn’t penalize the MPPT. These larger systems won’t notice the housekeeping power loss. Saving 10% on a $50,000 installation is certainly worth adding MPPT, even at the cost of a microprocessor. The peak power operating point can be tracked using a controller, or by using an estimate based on array temperature. In either case, the controlled state variable must be chosen. Normally the output current would be selected. But the output current is proportional to power and there will be two possible operating points. Notice that dv and di can be considered “small” signal parameters. So, if a relatively low frequency AC signal is introduced into the system, then di and dv can be extracted using a band-pass filter. Then the value at the dither frequency can be evaluated by demodulating the result. Now, here’s where simulation can be used to design the control system. Rather than writing the equations, the simulator can be used to evaluate the control law and set scale factors. Figure 14 shows how that’s done for the default array. First, the previously discussed solar panel model is used in X3, then X1 models a buck regulator operating in continuous conduction mode. Nodes dv and di are the dither signals extracted as though they are the only AC signals present. Later-on the PWM switching signal must be filtered. B2 is the control law for making the array voltage equal to the control signal. Finally, Vc is metered to see how it varies as the array voltage is swept using the control signal, Vs. Vs includes the dither signal from V2. Figure 15 shows the transient simulation results. Next, the signal from Vc is used for control and a step change in load is introduced to check on loop dynamics. This was accomplished by changing the B2 expression to
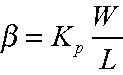
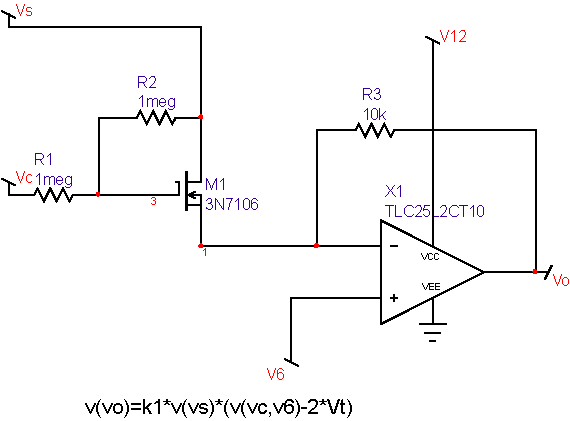
Having made an acceptable control law, the circuit implementation is needed. Three multiplications are required. That’s fairly expensive if general purpose analog multipliers are used; it’s not so bad for a microprocessor, but the sample rate needs to be high compared with the dither frequency. Continuing from an analog design perspective, the I*dv and V*di products are no more than variable gain circuits. Sometime in the 60s an unknown author described how to do this economically using a field effect transistor. Both JFETs and MOSFETs operated in the “linear” region (that’s physics talk for the engineers saturated region) follow the equation shown below for the grounded source configuration: For MOSFETS, you set, where W is the channel width, L is the length, and BETA and Kp are gain parameters. Both MOSFETS and JFETs work with slightly negative Drain-Source voltages (less than a diode drop). Now if you connect a large valued resistor between the drain and gate and an equal valued resistor to a control signal, then, Substituting back into the first equation, And the conductance is then proportional to the control voltage. Placing the FET at the input to an op-amp has the effect of making a 2-quadrant multiplier shown in Figure 17.
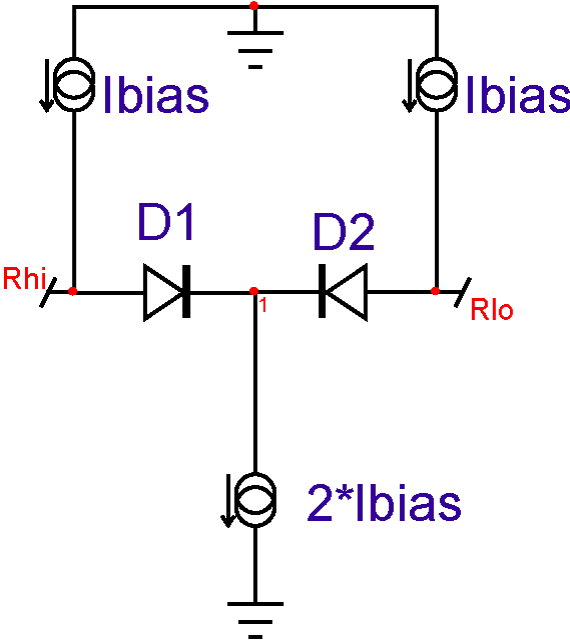
As the FET gate voltage exceeds threshold, the FET becomes a resistor. The threshold voltage varies considerably with time and temperature, so you should keep away from the threshold by a volt or so. As the voltage is increased further, the resistance decreases. In the limit, the resistance can’t decrease below the bulk resistance. These upper and lower boundaries limit the useful range of this gain control technique to something on the order of 10:1. For a larger dynamic range, diodes can be used. The circuit is more complex because the diode’s voltage offset must be cancelled by using a pair of diodes. Figure 18 shows the basic idea.
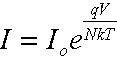
In forward conduction, the diode equation is where
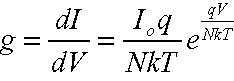
Solving for conductance Then substituting I back into the conductance equation This result holds over a remarkable range of current and is the basis for nearly all IC multiplier circuits.
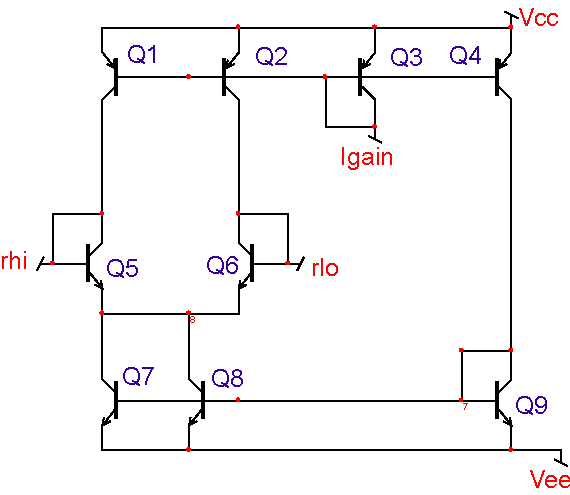
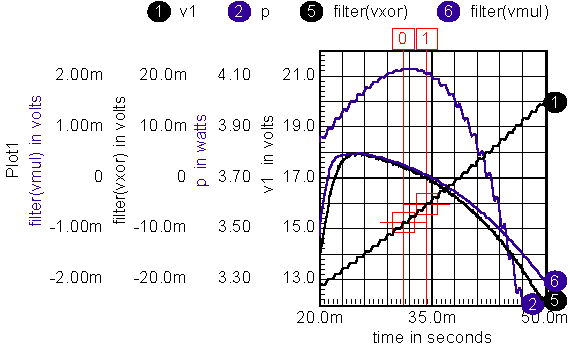
The FET resistance modulation scheme will be used for the low cost analog peak power tracker. The final product, where dp is multiplied by v(10), can actually be considered to be a phase detector. That’s accomplished by using the polarity of v(10), which is used to select the positive or negative dp result. Moreover, dp can also be limited, and the result is accomplished using an exclusive or gate. Figure 20 shows the result, comparing the xor with a multiplier for sol=.5. The schematic for this test case is in the drawing file named MPPT_MUL1.DWG. The PWM control was set to voltage mode and the array voltage was swept from 12 volts to 21 volts from about 20ms to 50ms. A 1 kHz dither signal was inserted in the control loop such that the AC array voltage was the same for all DC sweep values. Notice that the ripple in power minimizes at the peak power point.
The raw products were filtered in IntuScope using 5th-order Bessel filters, Delay=3m. Therefore, you must look at the data 3ms earlier to get the correct steady state values. The cursors are set at the zero crossing and 3ms prior to the zero crossing. Both the xor and multiplier produce about the same zero crossing. The peak power point is correctly detected at the zero crossing for both cases. Power stays within 2% of the peak over a 2.5-volt range of array voltage. The array voltage should be easily estimated within that band by accounting for solar cell temperature. That suggests the simpler open-loop MPPT would be acceptable for anything but the highest cost systems. Temperature can be measured using a forward biased silicon diode attached to the array. The array voltage for MPPT is then proportional to the diode voltage. TOP To determine the “wire length” of each winding in Magnetics Designer you can do the following: Intusoft has implemented two new powerful features for IsSpice4 Transient Analysis. In the new 8.x.11 Build 2641, new convergence options have been added to improve the accuracy and speed of transient analysis.
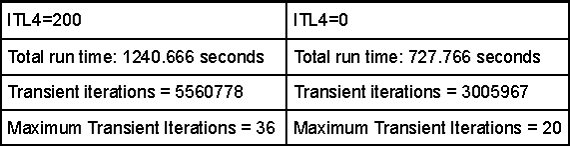
The second new feature is a novel way of using ITL4 in transient analysis. Recall that ITL4 is an option commonly used in SPICE-based simulators to control the number of iterations in each transient time point calculation. Up to now, ITL4 has been set by users to a large value (typically 100-500) in order to avoid the dreaded “time step too small” error in transient analysis. The problem with this approach is that it may result in making transient analysis unnecessarily longer than needed for most time points. Since the number is fixed, the simulator will scale back the time step after it has gone through that many iterations at every time point. This results in a long simulation run time.
As you can see there is a big improvement in both the total number of iterations and the total run time when using the new algorithm. We used an AMD Athlon64 3200 with 1G of ram in running these simulations. |
||||||||||||||||||||||||||||||||||||||||||
| |